How to Install Your Heat Pump: Step-by-Step GuideUpdated 4 months ago
Installing a FibroPool heat pump involves electrical wiring, water plumbing, and proper outdoor placement (level pad, airflow clearance, etc.). Incorrect installation can create safety hazards, damage the unit, cause leaks, or void your warranty. Local electrical and building codes often require permits.
We strongly recommend having a licensed electrician and qualified pool professional handle the full installation.
This guide is here to help you understand the steps, prepare your site in advance, gather the right materials, and communicate confidently with your installer. If you’re an experienced DIYer comfortable with 240V wiring and plumbing, the process is straightforward — but always follow the manual exactly and check local codes.
Congratulations on your new FibroPool heat pump, you're about to extend your swim season and have the whole neighbor asking how you get to swim when their water’s too cold. Getting the installation right is important, will save you headaches down the road, and helps ensure optimal performance. Warning - Installation Must Be Performed by a Qualified Person. Failing to do so, could void your warranty, or risk serious injury.
Most people can handle plumbing and positioning themselves, but safety first: Always shut off power at the breaker before starting. If anything feels off (like wiring or complex plumbing), pause and hire a licensed electrician or plumber - it's often required by local codes, protects your warranty, and keeps things safe. Incorrect setup can lead to errors like EE03 (flow issues) or even hazards.
This guide covers all models: Fixed-speed side-discharge (FH120/135/220/255/055/270) and vertical-discharge inverters (FH235-i/285-i). Grab your tools (PVC cutter, primer/glue, multimeter, screwdriver).
We’ve put together 2 videos for you, the one at the top of this article is our YouTube Installation Video and shows an installation demonstration on a real unit. The video below is a quick overview of this full guide.
Before You Start: Prep & Safety Check
Before diving in, unpack and inspect: Check for shipping damage (e.g., bent fins - minor ones are okay, but report big issues). Gather materials like 1.5" Schedule 40 PVC, unions, a bypass kit (highly recommended), and an equipment pad. Verify your electrical setup matches the model (120V plug for FH120/135; 240V dedicated circuit for others).
Why it matters: Skipping prep leads to mid-install frustrations or warranty voids.
Pro tip: If your pool has 1.5HP or higher pump, or 2" plumbing, plan for a bypass now, it prevents flow errors 65% of the time.
Call a pro if: You're unsure about codes or have non-standard setups (e.g., solar integration).

1. Positioning & Placement
Start by choosing a spot - outdoors, not enclosed, with good airflow to avoid overheating. Place on a solid, level surface like a concrete pad or blocks (at least 4" thick) to minimize noise and allow drainage. Keep it lower than pool water level for easy priming.
Step-by-step:
Measure your space against model dimensions (e.g., FH120: 16x40x24"; FH270: 39x15x27"—bigger footprint needs more room).
Level the ground if needed—use a level to avoid vibrations.
Set the unit down gently; attach drain adapters (5/8" hose optional) to route condensation away.
Why it matters: Poor positioning causes inefficiency, noise, or water pooling that rusts components.
Troubleshooting tip: If uneven, shim with rubber pads and test for wobble.
Model-specific notes:
FH120/135/220/255/055: Compact, fits small yards; use 16x32" pad.
FH270: Heavier (146lbs), needs sturdier 40x16" pad; ensure extra space for service access.
FH235-i/285-i: Vertical fan—avoid overhanging branches; 21x21x26" size suits tight spots.
Call a pro if: Site prep involves excavation or you're integrating with existing equipment.
2. Clearances for Airflow
Give your heat pump breathing room—airflow is key for pulling heat from the environment. Blockages lead to reduced efficiency or shutdowns.
Step-by-step:
Measure from walls/obstacles using the chart below.
Clear debris (leaves, snow) around the unit.
Test placement: Ensure no recirculation (hot air blowing back in).
Why it matters: Tight spaces drop COP by 20-30%, causing poor heating performance.
Troubleshooting tip: In windy areas, add a windbreak 24" away on non-fan sides.
Model-specific notes:
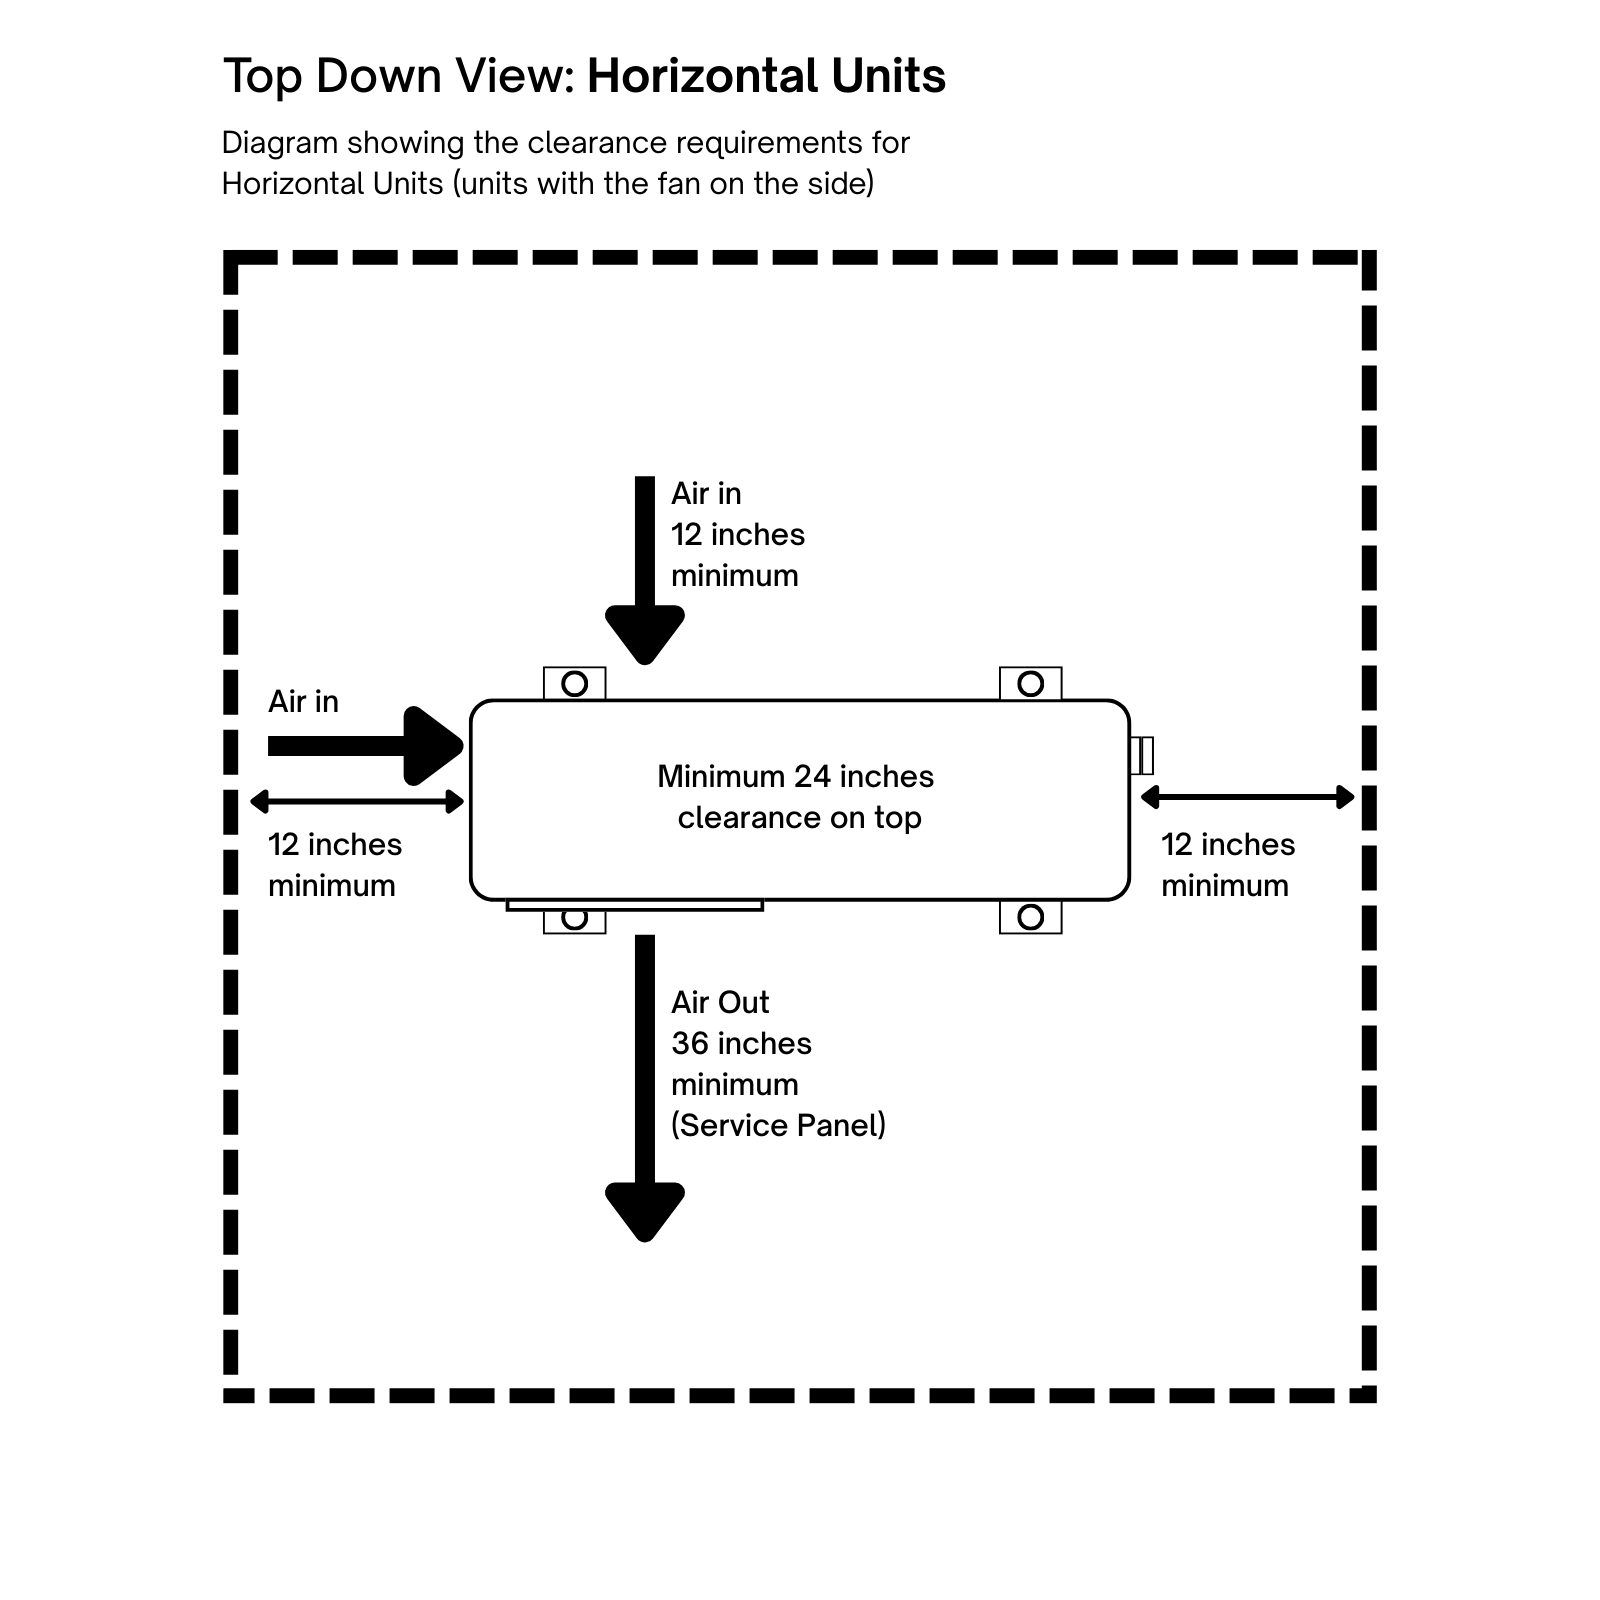
FH120/135/220/255/055: Side fan—36" front for easy access; 12" sides/back.
FH270: Similar side discharge but 18" back for larger coil.
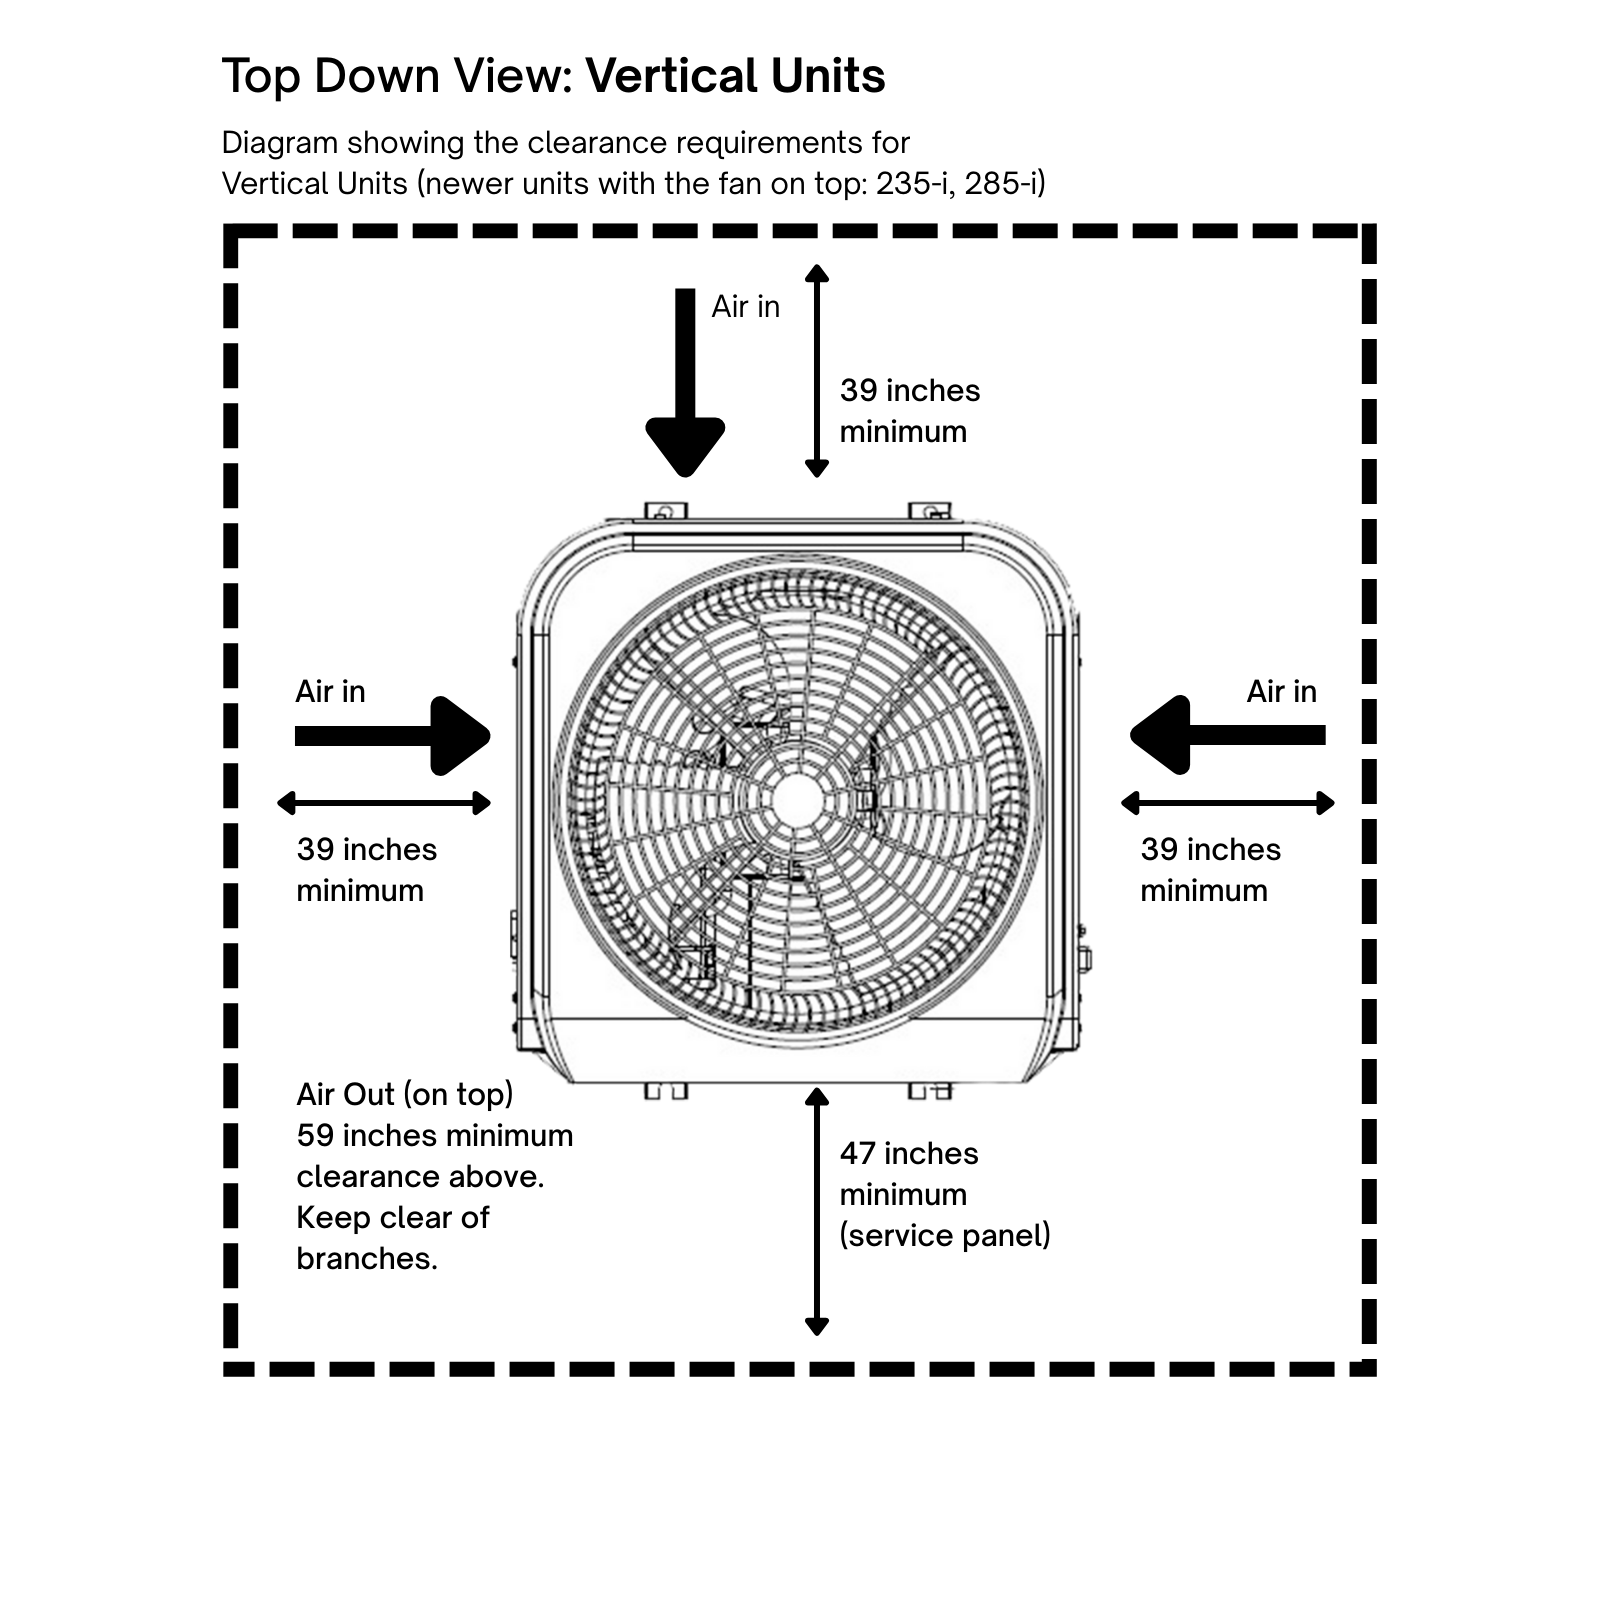
FH235-i/285-i: Vertical exhaust—60" overhead to avoid icing; 24" all sides for quiet operation.
Call a pro if: Clearances conflict with local codes or require modifications.
Side-Discharge Models (FH120/135/220/255/055/270)
Vertical-Discharge Models (FH235-i/285-i)
3. Plumbing Connections
Connect to your pool's filtration system after the filter, but before chlorinators (to avoid corrosion). Use 1.5" Schedule 40 PVC; inlet at bottom port, outlet at top—if reversed, it will trigger EE03/PL errors.
Step-by-step:
Shut off the pool pump and drain lines if needed.
Cut and dry-fit PVC (use unions for easy removal).
Prime/glue joints; let cure 24 hours.
Install check-valve if there is a backflow risk.
Why it matters: Proper flow (23-33 GPM optimal) ensures efficient heating; bad plumbing causes 65% of errors.
Troubleshooting tip: Test for leaks with pump on low—tighten unions if dripping.
Highly Recommended: Bypass Kit
Essential for 1.5HP+ pumps or 2" lines, allows flow adjustment and easy winterization.
Step-by-step: Add 3-way valves post-filter; tee in for bypass loop.
Model-specific: FH135/270 need reducers for 2" systems; inverters handle higher flows better.
Call a pro if: Plumbing involves cutting main lines or integrating with spas/solars—HVAC/plumber ensures no leaks.
4. Electrical Requirements
Licensed Electrician Strongly Recommended: mismatched voltage or poor grounding risks getting shocked or system failures. Review our Electrical Requirements guide for a deeper walkthrough - again, a licensed electrician is likely required by local codes and you risk voiding your warranty if you do the electrical work yourself without proper certification.
Step-by-step:
Confirm voltage (110-125V for 120V models; 220-245V for 240V) with multimeter.
Install dedicated circuit if needed (non-GFCI breaker for 240V to avoid trips).
Run wires through conduit to unit's electrical box; connect L1/L2/ground.
Bond to pool system: Attach 8 AWG copper to lug and pool bond wire.
Why it matters: Wrong setup trips breakers or burns motors, a common cause of performance issues.
Troubleshooting tip: If breaker trips, check for loose wires or overloads.
Model-specific notes:
FH120/135: Plug into GFCI outlet, no hardwiring needed, but test for 12.5A draw.
FH220/255/270: 240V hardwire; FH270's higher amp (up to 30A) may need thicker wire (check label).
FH235-i/285-i: Advanced controls, ensure stable voltage for inverter efficiency.
Call a pro if: Any wiring beyond plugging in - electricians handle codes, permits, and safety.
5. Startup & Testing
Now the fun part…fire it up and verify!
Step-by-step:
Prime lines: Fill exchanger with water, bleed air.
Turn on pool pump (wait 30 sec for flow).
Power up heat pump; set temp (hold UP/DOWN 3-5 sec to unlock on FH120 - see addendum).
Monitor: Gauge should rise, no leaks/noises, Delta T 5-10°F.
Run 24 hours initially for full system check.
Why it matters: Catches issues early, like reverse plumbing (fix before damage).
Troubleshooting tip: Error on startup? Reset breaker 3 min; check flow first.
Model-specific notes:
FH120/135: Simple plug for wall outlet, verify GFCI so it doesn't trip.
FH270: Longer startup delay (3 min); watch for higher noise initially.
Inverters: Auto-adjust flow; use app if available for diagnostics.
Call a pro if: Persistent errors or unusual sounds—HVAC tech for refrigerant checks.
Common mistakes: Reverse plumbing (EE03/PL), poor airflow (overheat), wrong breaker (trips). If there are issues, check Error Codes or Performance. You're all set - take a picture of your setup and share if you hit snags!